When it comes to additives in soap, I tend to be a bit skeptical as there are very few additives I feel make a huge difference to the final bars. There are three I use religiously – silk for lather texture, sugar for lather volume, and sodium lactate for bar hardness. These additives go into every batch of soap I make.
Recently, I’ve discovered another additive that is just as impressive – butter powder – unsalted, spray-dried butter powder to be exact. It makes the creamiest, most luxurious bar I’ve ever tried.
Butter powder contains a whopping 73% fat, three times the amount of sheep’s or cow’s milk powder. Because the milk is in powder form and not liquid, the fat does not need to be taken into account for saponification purposes, meaning the bar is super-fatted (or as I like to say ‘ultra-fatted’) without compromising the recipe or the final bars of soap.
The method I use for adding milk powders to soaps is slightly different than most. I never reconstitute the milk, but simply make a thin paste (or slurry) with the milk powder and a few teaspoons of the oils from my recipe. When making CP, I add this mixture at trace, just before adding the fragrance. When making HP, it goes in a few minutes after the soap has been removed from the heat and allowed to cool slightly. Doing it this way gives the soap all of the benefits of milk without the pitfalls of off-smells and the possibility of rancidity.
So will butter powder join silk, sugar, and sodium lactate as a must-have additive? Probably not. In this case, I’ll continue to give my customers a choice and perhaps offer one or two soaps with butter powder. I will, however, be including it in every batch I make for myself. I won’t be going without this little luxury in the future.

Monday, January 08, 2007


Sunday, December 31, 2006
Giving up Palm
One of my resolutions for the New Year is to stop using palm and palm kernel oil in my soaps. I actually gave up using it a few months ago, but New Year's Eve seems the perfect time to mention it. Palm oil production is not a sustainable industry, and I cannot justify wrecking valuable farm land for the sake of a few pence per bar while there are people in the world going hungry. The cost to the environment and humans is too great.
I only began using palm at in February of last year. It was a cheap and easy way to add bulk and hardness to my soaps. But have come back to my original recipe of olive, avocado, and coconut. I’ve never found a recipe I like more than my three-oil workhorse. Hazelnut oil is another favourite, and I’ve been subbing it for the avocado in a few recipes with marvellous results. For soap making, giving up palm is painless.
Giving up palm kernel oil will be even easier, since I’ve never cared for it at all. I know a lot of soap makers believe it’s milder than coconut oil, but aside from opinions, I’ve never seen any evidence of this. Palm kernel is expensive and difficult to work with due to its hardness. Scooping it out of the pail requires a mallet and chisel, and I just don’t have the time or energy. I’ll happily stick with coconut oil because it’s never let me down. Coconut oil’s ‘bad’ reputation seems to be down to a quote in an old soap-making book. Of course, this is the same book that advised soap makers to waste valuable ingredients by not scraping down the sides of their soap pans when pouring raw soap into the mold, so questioning the validity of the coconut oil claim isn’t silly.
Sadly, not every soap maker is willing to give up palm, and for this reason, I will have to continue using it for testing fragrance oils. Palm can be a bit brutal on fragrance, and without using it for testing, I can’t assure my fragrance oil customers that the oils they’re buying will perform well enough in any recipe. Palm also allows me to avoid using tallow or lard and still give accurate results. The good news is that I know of a supplier who sells fairly-traded, sustainable palm oil, and while it’s more than double the price of regular palm, I can use it without guilt pangs.
I only began using palm at in February of last year. It was a cheap and easy way to add bulk and hardness to my soaps. But have come back to my original recipe of olive, avocado, and coconut. I’ve never found a recipe I like more than my three-oil workhorse. Hazelnut oil is another favourite, and I’ve been subbing it for the avocado in a few recipes with marvellous results. For soap making, giving up palm is painless.
Giving up palm kernel oil will be even easier, since I’ve never cared for it at all. I know a lot of soap makers believe it’s milder than coconut oil, but aside from opinions, I’ve never seen any evidence of this. Palm kernel is expensive and difficult to work with due to its hardness. Scooping it out of the pail requires a mallet and chisel, and I just don’t have the time or energy. I’ll happily stick with coconut oil because it’s never let me down. Coconut oil’s ‘bad’ reputation seems to be down to a quote in an old soap-making book. Of course, this is the same book that advised soap makers to waste valuable ingredients by not scraping down the sides of their soap pans when pouring raw soap into the mold, so questioning the validity of the coconut oil claim isn’t silly.
Sadly, not every soap maker is willing to give up palm, and for this reason, I will have to continue using it for testing fragrance oils. Palm can be a bit brutal on fragrance, and without using it for testing, I can’t assure my fragrance oil customers that the oils they’re buying will perform well enough in any recipe. Palm also allows me to avoid using tallow or lard and still give accurate results. The good news is that I know of a supplier who sells fairly-traded, sustainable palm oil, and while it’s more than double the price of regular palm, I can use it without guilt pangs.
Thursday, July 27, 2006
Hot Process Hints
For me, the hot process method is the quickest and easiest way to make soap. There is very little room for error and the soap turns out great 99% of the time. Still, there is that 1%, so I thought I'd try to shed some light on some common HP problems and how to easily solve them.
By no means is this a comprehensive list, but hopefully it will help you if you’re having trouble with your HP. Please bear in mind that my observations take into account that the recipe being used isn't flawed and that the equipment used (slow cooker, double boiler, oven, etc) is in good working order.
1. My soap is really thick and I have trouble getting it into the mold.
This is probably the most common problem with making HP soap. Fortunately, it's also the easiest to solve. Thick soap is usually caused by a lack of water, so it's important never to do a water discount with HP. In fact, it's a good idea to add an additional 5-10% to the recommended full water amount. I wouldn't suggest going over 10% as the extra evaporation while the soap cures can cause the sliced bars to warp or bend. The extra water may be added to the lye solution or even to the finished soap before it goes into the mold. I have 'thinned' out many a batch of thick soap by adding a small amount of hot water at the end of the cook, but it does require careful and lengthy stirring to fully incorporate into the soap.
In addition to extra water, there are a couple of additives that can help keep the soap more fluid. Adding 3-5% sugar to the lye solution before the lye is added can help keep the soap from getting too thick. It is imperative that all of the sugar is dissolved before the lye goes in or you'll end up with a caustic boiled sweet! Sodium lactate is another additive that can keep soap fluid, however, add no more than 5% or the soap can become brittle. Sodium lactate is a forgiving ingredient and may be added at any time during the soap making process. I prefer adding it at trace.
2. My soap has lumpy bits in it.
When I first started making HP, I had the lumpiest soap ever. Even the cured bars showed the tell-tale white spots. There are two main reasons for hard lumps in soap -- over-heating and over-cooking. In my experience, HP should never be brought to a temperature over 140F (60C). Doing so causes the indirect heat source to become more direct as the sides of the pot or slow cooker heat up enough to over-cook or burn the soap. The hot sides contact the soap, causing bits to over-heat and harden. While harmless, these hard bits will affect the look of the finished soap.
As with cooking soap at too high a temperature, cooking it too long will also cause lumps. A longer cook time means more evaporation -- and evaporation means harder, thicker soap. As the soap continues to over-cook, the soap will begin to form hard lumps. I have rarely had a batch of soap of any size which required cooking for more than 45 minutes.
3. My soap zaps!
Barring any mistakes with the recipe, zapping soap is undercooked. To avoid a heat or lye burn, soap shouldn't be zap tested (touching a small amount of cooked soap to the tongue) at all without meeting a few criteria first:
- Soap should be at the gel stage and there should be no parts of the soap that are not translucent. If the soap resembles cake batter in any way, do not touch it.
- Soap should be cooled before testing. While 140F isn't boiling, it can still burn.
- Soap should be rubbed between the fingers before testing. If the soap feels waxy and smooth, it's fairly safe to test, but if there are any rough or gritty bits, it should not be touched to the tongue.
If you’ve met the criteria and the soap zaps, simply cook it a bit longer.
These tips won’t solve every problem you might encounter with HP, but hopefully they’ll help you achieve more trouble free batches. If you have any hints you’d like to add, please leave me a comment. My hope is that by sharing, we can make HP a nearly fool-proof method!
By no means is this a comprehensive list, but hopefully it will help you if you’re having trouble with your HP. Please bear in mind that my observations take into account that the recipe being used isn't flawed and that the equipment used (slow cooker, double boiler, oven, etc) is in good working order.
1. My soap is really thick and I have trouble getting it into the mold.
This is probably the most common problem with making HP soap. Fortunately, it's also the easiest to solve. Thick soap is usually caused by a lack of water, so it's important never to do a water discount with HP. In fact, it's a good idea to add an additional 5-10% to the recommended full water amount. I wouldn't suggest going over 10% as the extra evaporation while the soap cures can cause the sliced bars to warp or bend. The extra water may be added to the lye solution or even to the finished soap before it goes into the mold. I have 'thinned' out many a batch of thick soap by adding a small amount of hot water at the end of the cook, but it does require careful and lengthy stirring to fully incorporate into the soap.
In addition to extra water, there are a couple of additives that can help keep the soap more fluid. Adding 3-5% sugar to the lye solution before the lye is added can help keep the soap from getting too thick. It is imperative that all of the sugar is dissolved before the lye goes in or you'll end up with a caustic boiled sweet! Sodium lactate is another additive that can keep soap fluid, however, add no more than 5% or the soap can become brittle. Sodium lactate is a forgiving ingredient and may be added at any time during the soap making process. I prefer adding it at trace.
2. My soap has lumpy bits in it.
When I first started making HP, I had the lumpiest soap ever. Even the cured bars showed the tell-tale white spots. There are two main reasons for hard lumps in soap -- over-heating and over-cooking. In my experience, HP should never be brought to a temperature over 140F (60C). Doing so causes the indirect heat source to become more direct as the sides of the pot or slow cooker heat up enough to over-cook or burn the soap. The hot sides contact the soap, causing bits to over-heat and harden. While harmless, these hard bits will affect the look of the finished soap.
As with cooking soap at too high a temperature, cooking it too long will also cause lumps. A longer cook time means more evaporation -- and evaporation means harder, thicker soap. As the soap continues to over-cook, the soap will begin to form hard lumps. I have rarely had a batch of soap of any size which required cooking for more than 45 minutes.
3. My soap zaps!
Barring any mistakes with the recipe, zapping soap is undercooked. To avoid a heat or lye burn, soap shouldn't be zap tested (touching a small amount of cooked soap to the tongue) at all without meeting a few criteria first:
- Soap should be at the gel stage and there should be no parts of the soap that are not translucent. If the soap resembles cake batter in any way, do not touch it.
- Soap should be cooled before testing. While 140F isn't boiling, it can still burn.
- Soap should be rubbed between the fingers before testing. If the soap feels waxy and smooth, it's fairly safe to test, but if there are any rough or gritty bits, it should not be touched to the tongue.
If you’ve met the criteria and the soap zaps, simply cook it a bit longer.
These tips won’t solve every problem you might encounter with HP, but hopefully they’ll help you achieve more trouble free batches. If you have any hints you’d like to add, please leave me a comment. My hope is that by sharing, we can make HP a nearly fool-proof method!
Thursday, May 25, 2006
Sodium Lactate
Sodium lactate is an ingredient I can't do without. The tiniest amount (I get by with 2%) makes such a difference in the fluidity and hardness of hot process soap. Having a fluid HP makes it much easier to get into the molds. A quick hardening makes it easier to get back out.
Sodium lactate is also a very forgiving ingredient. I've added it at just about every possible stage of the soap making process and it works every time. I've also used it in both the powder and liquid forms, again with consistent success. The only time I've ever had a problem with sodium lactate is when I've added too much. Anything at or above 5% makes my soap crumble and break.
For best results, I prefer to make my own solution. To make this solution, I weigh out sodium lactate powder equal to 2% of my batch weight (usually 50g) and then multiply the amount by 5 to figure out how much water I'll need (250g). I subtract the water from my total recipe, mix it with the powder and add it back to the soap at a light-to-medium trace. A stick blender is very handy for getting it to incorporate. I always get soap that will easily sieve through a slotted spoon and then harden up to candle-wax consistency within a few hours.
If you enjoy making hot process soap, I can't recommend sodium lactate enough. Even a small amount in a weak solution turns out a great batch of soap.
Sodium lactate is also a very forgiving ingredient. I've added it at just about every possible stage of the soap making process and it works every time. I've also used it in both the powder and liquid forms, again with consistent success. The only time I've ever had a problem with sodium lactate is when I've added too much. Anything at or above 5% makes my soap crumble and break.
For best results, I prefer to make my own solution. To make this solution, I weigh out sodium lactate powder equal to 2% of my batch weight (usually 50g) and then multiply the amount by 5 to figure out how much water I'll need (250g). I subtract the water from my total recipe, mix it with the powder and add it back to the soap at a light-to-medium trace. A stick blender is very handy for getting it to incorporate. I always get soap that will easily sieve through a slotted spoon and then harden up to candle-wax consistency within a few hours.
If you enjoy making hot process soap, I can't recommend sodium lactate enough. Even a small amount in a weak solution turns out a great batch of soap.
Sunday, January 22, 2006
Crock Pot Hot Process Soap Tutorial -- Photo Heavy!
Here are a few pictures to show what happens when I make CPHP. Your results may vary, though!
Please note that this tutorial is designed for those already familiar with cold process soap making.
Melt oils and mix up lye solution as you would with CP. You don’t have to worry about controlling the temperatures. Add the lye solution to the oils as soon as you’re confident the lye is completely dissolved. You can stick blend them together right in the crock pot:
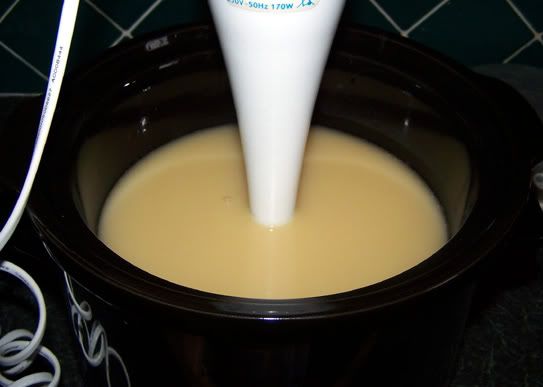
After you’ve reached a nice, thick trace, put the lid on, check the crock pot is set to low, and entertain yourself for about a half an hour. Obsessive folk like me might return to the pot every five to ten minutes for a peek, but there probably won’t be much happening. After about thirty minutes (more or less, depending on your crock pot’s temperature), the edges will begin to gel:
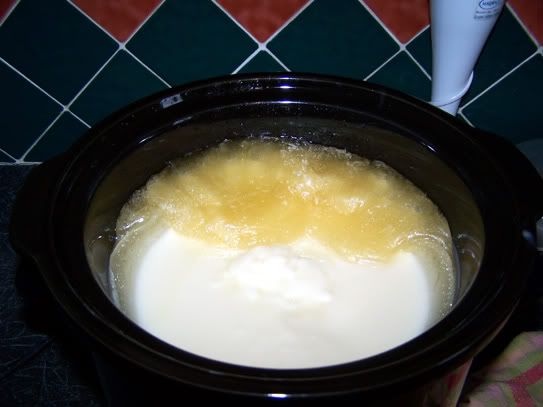
Check back in about ten minutes and the gel will have spread from the edges toward the centre. I usually refer to this as ‘raw soap island surrounded by a gel ocean’. Unfortunately, on the day I decide to take photographs, we have ‘raw soap island being overrun by a gel tsunami’:
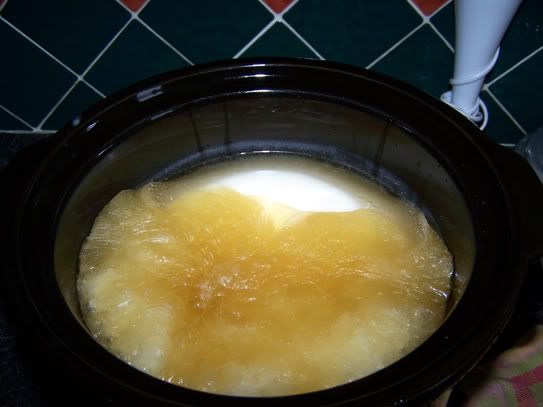
Five minutes later, raw soap island is gone:
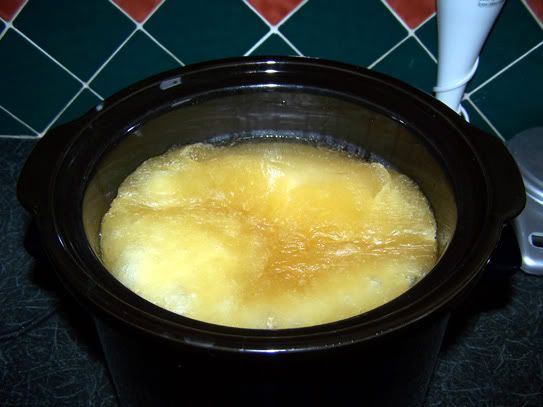
It is at this time I remove the pot from the heat source and give a quick stir just to be sure the gel is complete. If it isn’t, you’ll find a chunk of lighter-coloured raw soap floating in the gel. If you still have raw soap, pop it back in the heat source and cook for another five to ten minutes. This one has completely gelled:
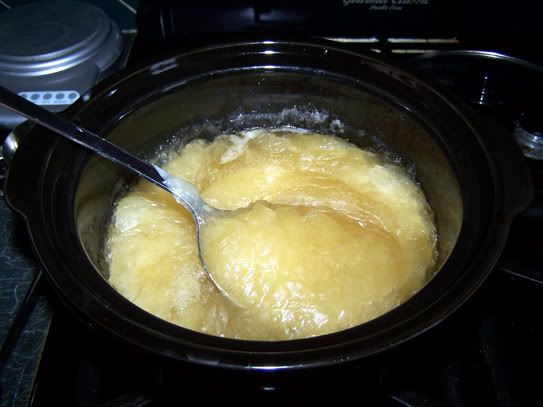
Now you can zap test the soap by taking a little bit out and rubbing it between your fingers to help it cool. It should feel waxy. Once the soap has cooled, lightly tap your tongue with it. If you get a sensation that feels like a 9-V battery, you have active lye in your soap and will need to cook it some more. If not, you can move on to the next step.
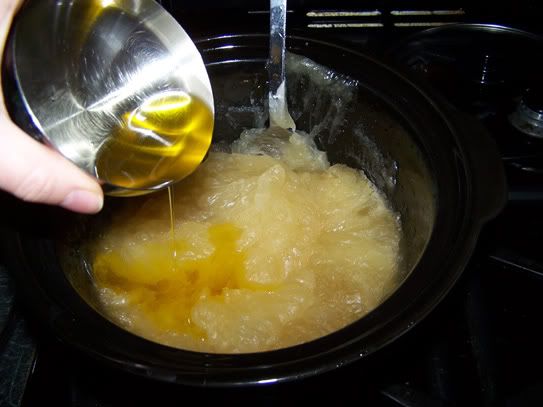
When making HP, I add my additives at the end of the cook to avoid having the kitchen smell like the monkey cage at the zoo. Any milks, honey, fruit or veggie purees, etc should go in after the cook. Oils and butters added after the cook will not be saponified, so you get all of their benefits. Today I’m superfatting with a bit of jojoba:
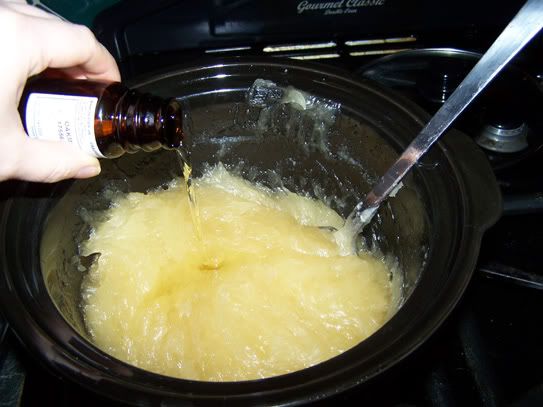
And now a lovely oakmoss fragrance goes in:
While you weren’t looking, I removed a cup or so of soap from the pot and dyed it green. This has been added back to the soap:
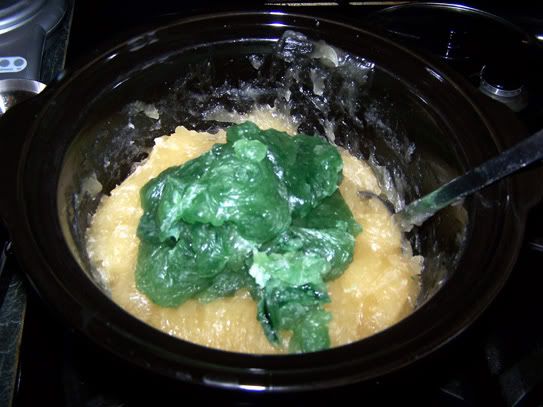
And lightly stirred to make an in-the-pot swirl:
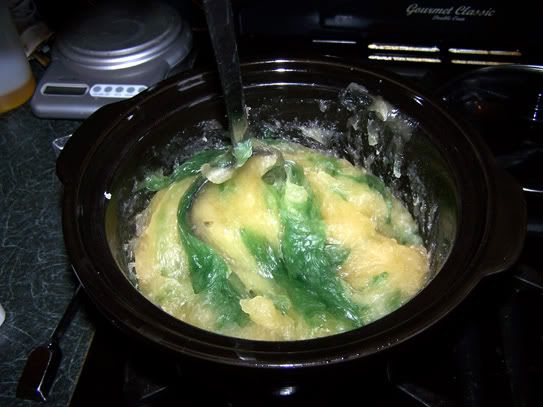
And then spooned into the molds to cool:
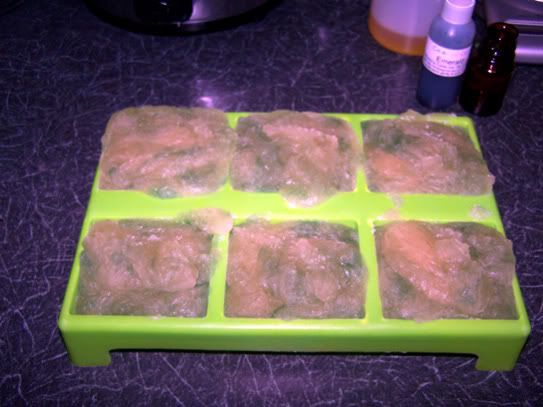
When the soap has cooled, turn it out and you’re done!
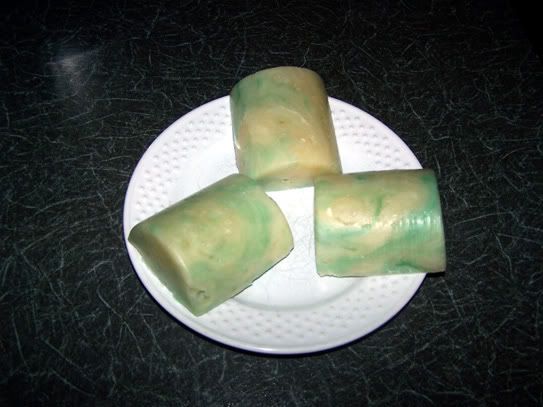
Remember that any HP needs to cure for at least one week, preferably two. It’ll get harder and milder in this time.
Due to time constraints, I'm no longer able to support questions with regard to the tutorial. Thank you to everyone who has taken time to comment. I hope you'll continue to visit!
Please note that this tutorial is designed for those already familiar with cold process soap making.
Melt oils and mix up lye solution as you would with CP. You don’t have to worry about controlling the temperatures. Add the lye solution to the oils as soon as you’re confident the lye is completely dissolved. You can stick blend them together right in the crock pot:
After you’ve reached a nice, thick trace, put the lid on, check the crock pot is set to low, and entertain yourself for about a half an hour. Obsessive folk like me might return to the pot every five to ten minutes for a peek, but there probably won’t be much happening. After about thirty minutes (more or less, depending on your crock pot’s temperature), the edges will begin to gel:
Check back in about ten minutes and the gel will have spread from the edges toward the centre. I usually refer to this as ‘raw soap island surrounded by a gel ocean’. Unfortunately, on the day I decide to take photographs, we have ‘raw soap island being overrun by a gel tsunami’:
Five minutes later, raw soap island is gone:
It is at this time I remove the pot from the heat source and give a quick stir just to be sure the gel is complete. If it isn’t, you’ll find a chunk of lighter-coloured raw soap floating in the gel. If you still have raw soap, pop it back in the heat source and cook for another five to ten minutes. This one has completely gelled:
Now you can zap test the soap by taking a little bit out and rubbing it between your fingers to help it cool. It should feel waxy. Once the soap has cooled, lightly tap your tongue with it. If you get a sensation that feels like a 9-V battery, you have active lye in your soap and will need to cook it some more. If not, you can move on to the next step.
When making HP, I add my additives at the end of the cook to avoid having the kitchen smell like the monkey cage at the zoo. Any milks, honey, fruit or veggie purees, etc should go in after the cook. Oils and butters added after the cook will not be saponified, so you get all of their benefits. Today I’m superfatting with a bit of jojoba:
And now a lovely oakmoss fragrance goes in:
While you weren’t looking, I removed a cup or so of soap from the pot and dyed it green. This has been added back to the soap:
And lightly stirred to make an in-the-pot swirl:
And then spooned into the molds to cool:
When the soap has cooled, turn it out and you’re done!
Remember that any HP needs to cure for at least one week, preferably two. It’ll get harder and milder in this time.
Due to time constraints, I'm no longer able to support questions with regard to the tutorial. Thank you to everyone who has taken time to comment. I hope you'll continue to visit!
Friday, December 09, 2005
Eugenol in Fragrance Oils
Eugenol is a naturally-occurring component of both cinnamon and cloves. It is extracted from their essential oils and widely used in mouthwash, medicines, flavourings and fragrances. Eugenol is also one of the 26 potential allergens outlined by the 7th Amendment to the Cosmetics Directive. Having it specifically listed is extremely fortunate for soapers – not because it is a particularly dangerous component, but rather because it causes soap to seize.
To help European soapers comply with Amendment 7, we will supply both the MSDS and the allergen declaration for every fragrance oil we sell. The allergen document will reveal the presence of eugenol if it is contained in the oil. Most likely, it will only be found in floral fragrances, as that is the only type of fragrance that seems to require eugenol out of necessity, hence the tendency of most florals to accelerate or seize up once added to the soap pot.
To help European soapers comply with Amendment 7, we will supply both the MSDS and the allergen declaration for every fragrance oil we sell. The allergen document will reveal the presence of eugenol if it is contained in the oil. Most likely, it will only be found in floral fragrances, as that is the only type of fragrance that seems to require eugenol out of necessity, hence the tendency of most florals to accelerate or seize up once added to the soap pot.
Subscribe to:
Posts (Atom)